Here I bring you TATTOO, Terraform, AWS, Typescript, Telegram bot Of OpenAI ChatGPT.
In today’s world, we see more and more companies using chatbots to handle common customer inquiries. With advancements in Natural Language Processing (NLP), we can train chatbots to understand and learn from past interactions with users. This is where OpenAI’s GPT Model (Generative Pre-trained Transformer Model) comes into play. With it, we can generate automatic responses that are tailored to the context of the conversation.
In this tutorial, we will learn how to leverage Terraform to deploy a chatbot that is powered by OpenAI’s GPT Model on AWS. Specifically, we will focus on the creation of a Telegram bot using the Telegram Bot API, and its integration with OpenAI’s GPT API.
Creating a Telegram Bot
Telegram is a popular messaging application that provides an open API for developers to easily create bots. In order to create a Telegram bot:
- First, you will need to create a Telegram account or sign in to your existing one.
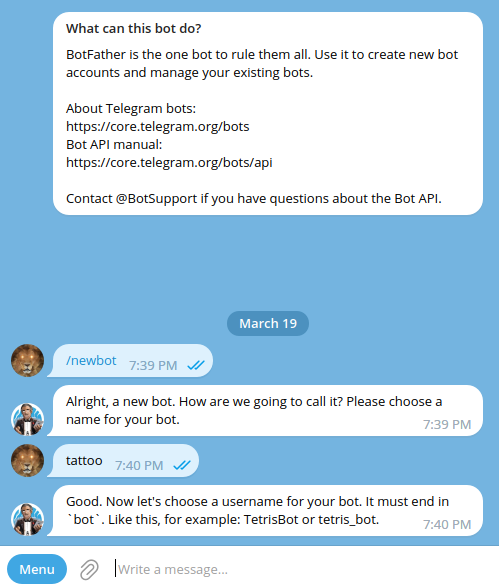
- Next, search for the “BotFather” and start a chat with it.

- Once the chat is opened, type “/newbot” to create a new bot.
- BotFather will then ask you to choose a name and username for your bot, once chosen, it will provide you with an API token. Keep this token secure, as it is the unique identifier for your Telegram bot.
Retrieving the OpenAI API keys
Once we have the Telegram Bot token, we can move on to retrieving the OpenAI API keys:
- First, sign up or sign in to your OpenAI account.
- Navigate to your dashboard and create a new API key.
- Once created, copy the key and keep it secure.
Deploying the Application to AWS using Terraform
Prerequisites
The tools you will need to complete the build:
- AWS Console
- AWS Command Line Interface
- Terraform by HashiCorp
- Node.js and NPM
- tfenv (optional)
For AWS and Terraform setup, please read my other articles, this one or this one , and follow the build instructions. To install Node.js and npm, follow this instruction .
Instructions
- Clone the repository:
$ git clone git@github.com:blokaly/tattoo.git
- Navigate to the
tattoodirectory:
$ cd tattoo
- Edit the file called
values.tfvarswith the following contents:
|
|
Make sure to replace <telegram_bot_token> and <openai_api_key> with your own API tokens. And also can define the ChatGPT completions max toke and temperature values here.
- Initialize Terraform in the current directory:
$ terraform init
- Deploy the infrastructure to AWS:
$ terraform apply -var-file="values.tfvars"
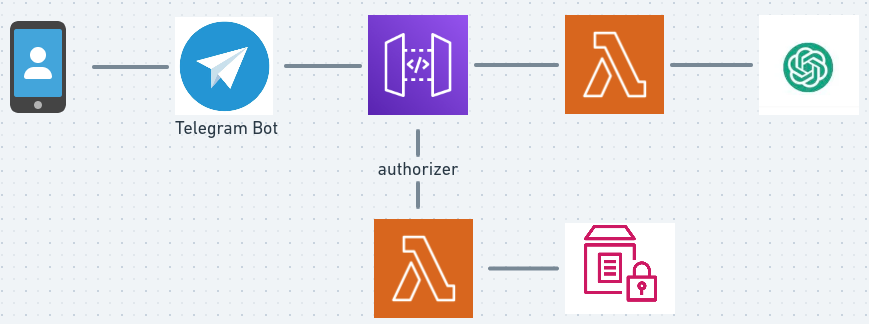
- Terraform will now create a new API Gateway, 2 Lambda functions, IAM policies and roles, and save the secret tokens/keys in the Parameter Store.
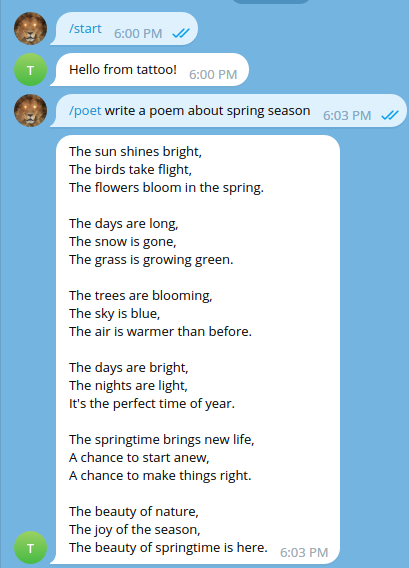
That’s it! Your chatbot is now deployed and ready to use. You can communicate with your bot through Telegram by simply searching for the username that you created earlier.
Overview
- Here is the tattoo project structure 📂
|
|
main.tf and values.tfvars are for Terraform, other files are a typical typescript project setup.
- There is a JSON file,
prompts.json, under the src folder. It contains a set of pre-defined ChatGPT prompts based on different languages, file format like below
|
|
and such as this:
|
|
You can search for well written prompts and setup the ones you like. Here are two sources: awesome-chatgpt-prompts
and best-chatgpt-prompts
. After you added and deployed your own prompt commands, then the command can be used as /<command> in telegram bot.
- This project integrated the Telegram bot using Telegraf.js library. Telegraf is a library that makes it simple for you to develop your own Telegram bots using JavaScript or TypeScript. See its documentation for details.
- In order to make sure that the Telegram webhook was set by you and also prevent the AWS API from accessing by other unauthorised application, we can pass a secret token via the setWebhook
call. Then the Telegram request will contain a header “X-Telegram-Bot-Api-Secret-Token” with the secret token as content, which subsequently can be verified by the the Lambda authoriser.
📃app.ts:
|
|
Line 5 to line 12, if a setWebhook event triggered, then we lookup the secret token from Parameter Store and set it for the Telegram webhook.
Line 14 to line 20, as the authoriser Lambda, we check if the request header contains the secret token, only accept if it does.
5. We configure the 2 Lambda functions in the mai.tf 📃
|
|
These 2 Lambda functions are using the same compiled and zipped file. In line 10, we pass the secret token name as the environment variable to the Lambda, and the Lambda authorise function will use the name to lookup the Parameter Store, retrieving the encrypted secret token.
In conclusion, I hope this tutorial has given you a brief introduction to Terraform, AWS, Telegram bot creation, and OpenAI’s GPT Model. I encourage you to take this further and explore the many possibilities that these technologies provide. Happy coding!
References
- https://advancedweb.hu/deploy-a-serverless-telegram-bot-to-aws-using-terraform/
- https://aws.amazon.com/api-gateway/
- https://aws.amazon.com/lambda/
- https://docs.aws.amazon.com/systems-manager/latest/userguide/systems-manager-parameter-store.html
- https://core.telegram.org/bots/api
- https://platform.openai.com/docs/api-reference
- https://telegrafjs.org/#/?id=introduction